

Ultimate Guide to Gateway Mounting Options
When setting up a LoRaWAN gateway, how and where you mount it can make or break your network’s performance. Here’s what you need to know:
- Height matters: Elevating your gateway and improving line of sight can significantly increase coverage (impact varies by environment, antenna, and surrounding obstacles).
- Indoor vs. Outdoor: Indoor setups cover shorter ranges, while outdoor installs can reach several miles depending on conditions.
- Key factors: Prioritize height, proper antenna alignment, and minimizing interference for optimal performance.
- Cable length: Keep coaxial cables as short as possible to reduce signal loss.
- Weatherproofing: Use outdoor-rated enclosures (IP65/IP67) and lightning protection.
Whether you’re mounting indoors or outdoors, choosing the right location and hardware ensures better coverage, protects your equipment, and maintains strong signals. Let’s explore how to get it right.
Building a LoRaWAN Gateway Setup With Milesight UG65
Core Principles for Gateway Mounting
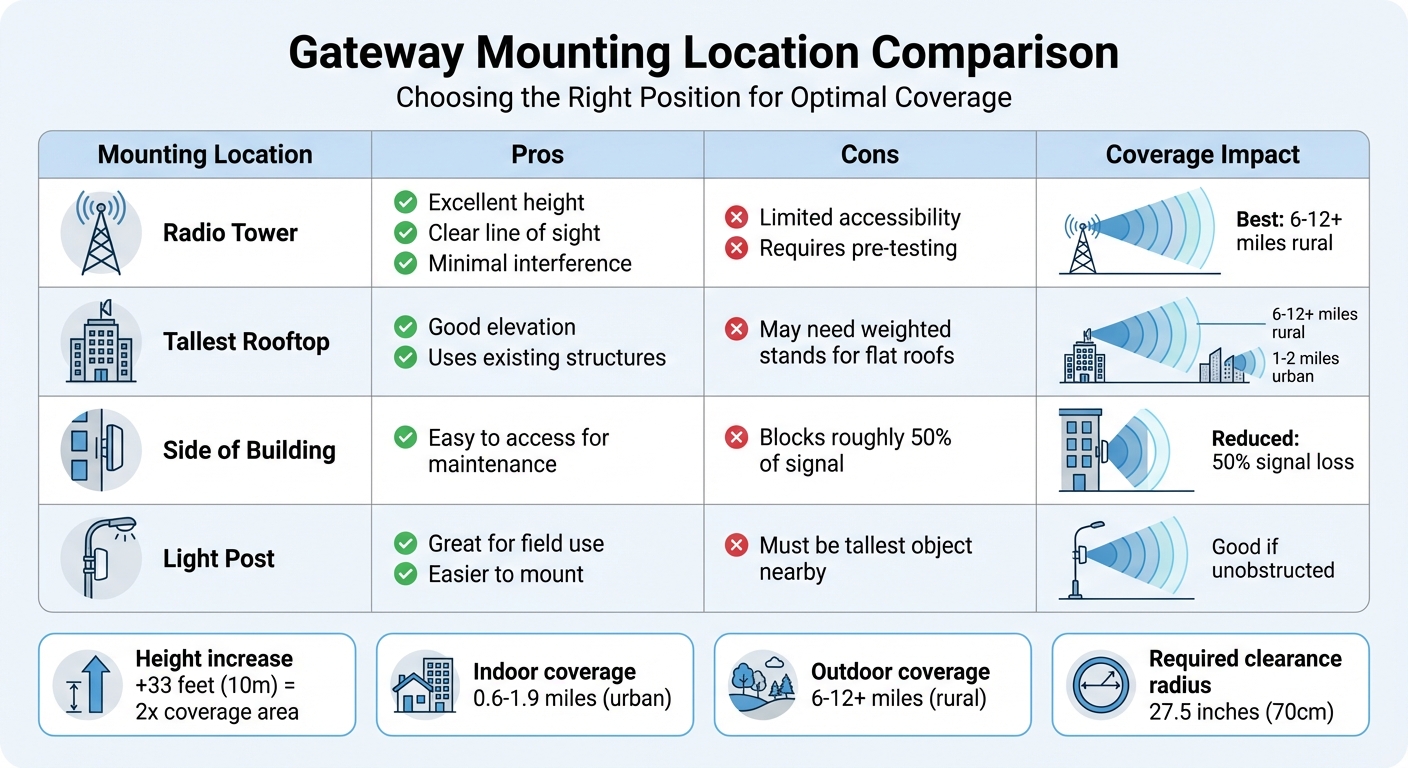
LoRaWAN Gateway Mounting Location Comparison: Performance and Coverage
When it comes to mounting your gateway, three key factors play a crucial role: height, antenna alignment, and environmental interference. Let’s dive into how these elements shape your setup decisions.
Height and Position Requirements
Height is your best friend for coverage. The higher your gateway is mounted, the farther its signal can travel. Ideal mounting spots include radio towers, rooftops, and light posts, as these elevate the antenna above obstructions and provide a clear line of sight to your sensors.
However, side-mounted gateways can reduce signal effectiveness by up to 50%, as they block half the signal. This setup only works if all sensors are positioned on the unobstructed side. For flat-roof installations, a weighted mounting stand is essential to ensure the antenna clears the roofline and avoids being shadowed by the building.
“LoRa is a technique that can cover great distances, but the more obstacles that are in between the sensors and the gateway, the shorter the range becomes.” – RAKwireless
Line of sight is crucial. Hills, trees, and buildings don’t just block signals – they scatter and weaken them. Radio waves travel within a football-shaped path known as the Fresnel Zone. If obstacles intrude on this zone, your signal strength can drop significantly. The range in urban areas is shorter, while rural deployments can reach farther depending on placement.
Your antenna also needs space to “breathe.” Ensure sufficient clearance from nearby obstructions to avoid signal attenuation and achieve optimal performance.
| Mounting Location | Pros | Cons |
|---|---|---|
| Radio Tower | Excellent height, clear line of sight, minimal interference | Limited accessibility; requires pre-testing |
| Tallest Rooftop | Good elevation, uses existing structures | May need weighted stands for flat roofs |
| Side of Building | Easy to access for maintenance | Can partially block signal |
| Light Post | Great for field use, easier to mount | Must be the tallest object nearby |
Once you’ve chosen the right location, it’s time to focus on antenna orientation.
Antenna Orientation and Obstruction Management
Alignment is everything. For omnidirectional antennas, they must be mounted perfectly vertical to deliver full 360-degree horizontal coverage. Additionally, the polarization of your gateway antenna – either horizontal or vertical – must match your end-node devices. Even small tilts can disrupt signal reception. As Data Alliance puts it:
“The orientation of your antenna is critical for receiving LoRa signals. Poor orientation can mean that no signals can reach the antenna.”
Reducing Environmental Interference
Beyond height and alignment, reducing interference is essential to maintaining signal quality.
Watch out for electronic and metallic interference. Nearby electrical devices can cause intermodulation and detuning of your antenna. Keep your gateway away from high-power electronics like HVAC systems, industrial machines, or other wireless equipment.
Cable length and quality matter. Longer cables mean more signal loss. Keep the coaxial cable between your gateway and antenna as short as possible. If you need more distance, use Power over Ethernet (CAT 5e or higher) to mount the gateway closer to the antenna, running an Ethernet cable back to your power source. If longer coaxial cables are unavoidable, opt for low-loss cables like LMR 200 to minimize attenuation.
Protect your equipment. Follow manufacturer guidelines for unused ports to prevent damage to internal electronics. For outdoor setups, lightning protection is a must. Install lightning arrestors on rooftops or towers to shield your equipment from electrical surges. Also, use IP67-rated enclosures for RF connectors and seal them properly to keep out moisture.
Indoor Mounting Methods
When setting up your gateway indoors, placement is everything. The key is finding a central spot among your sensors and positioning the gateway high enough to avoid obstacles like desks, shelves, or other objects that can block signals. The higher and more central the placement, the better the coverage.
Wall mounting is a practical choice for most spaces. Start by selecting a location that sits at the center of your sensor network – this ensures balanced signal distribution. Mount the gateway high on the wall, and make sure the LoRa antenna is pointing straight up vertically. Avoid placing the gateway near large metal objects, elevator shafts, or high-current electrical equipment, as these can interfere with signals. Materials like reinforced concrete and Low-E glass can be especially problematic, as the rebar in concrete can significantly block or weaken RF signals.
Wall Mounting Instructions
To install the gateway on a wall:
- Align the mounting bracket horizontally with the logo facing up.
- Mark the four bracket positions, drill holes using a 6 mm bit to a depth of about 1.25 inches (32 mm), and insert wall plugs.
- Secure the bracket with screws, attach the fixing screws to the back of the gateway, and slide it into the bracket slots until it locks in place.
Double-check that the antenna is securely attached and that unused ports are capped with a 50 Ohm load to prevent signal loss. If you’re using Power over Ethernet (PoE), run a CAT 5e or higher cable. This simplifies installation in high-wall locations where power outlets might not be accessible.
If wall mounting doesn’t suit your space, ceiling or rack mounting might be better options, especially in larger facilities.
sbb-itb-0e600ab
Ceiling and Rack Mounting Options
For spaces where wall mounting doesn’t provide the necessary elevation, ceiling and rack mounting offer great alternatives to extend your network’s reach.
Ceiling mounting works well in warehouses and multi-story buildings. By placing the gateway at the highest point in the room, you minimize signal blockages from furniture, machinery, or foot traffic. For buildings with multiple floors, low-gain omnidirectional antennas (2–5 dBi) are a smart choice. These antennas have a “donut-shaped” radiation pattern, which ensures better coverage for floors above and below the gateway. PoE is especially useful here, as it combines power and network connectivity in one cable, making it easier to install in hard-to-reach areas.
Rack mounting suits data centers and industrial environments. This method integrates the gateway into existing IT setups, providing centralized management and reliable network connections. If you’re mounting the gateway inside a metal rack, use an antenna extension cable or a magnetic base to position the antenna outside the enclosure. This prevents signal loss caused by the metal housing. In noisy industrial settings, you might also want to use band-pass filters to isolate LoRaWAN signals and block interference from LTE, 5G, or radar. For example, semi-industrial gateways like the Milesight UG65 can cover large indoor deployments depending on layout.
Outdoor Mounting Methods
Shifting from indoor setups to outdoor installations brings a new set of challenges. Weather resistance and long-term durability are critical – exposure to harsh elements can wear down equipment quickly. However, when installed correctly, outdoor gateways offer impressive coverage. For instance, a LoRaWAN gateway, with a receive sensitivity of around -142 dBm, can detect very low-power signals over long distances. In open areas like rural landscapes or over water, varying ranges of kilometers are possible, and in one exceptional case, a LoRaWAN gateway on a weather balloon picked up a signal from 700 km away due to perfect line-of-sight conditions.
Height is key to outdoor coverage. Robert Liao, Technical Support Engineer at Robustel, explains:
“Mounting your LoRaWAN gateway 10 meters higher [may] double your coverage area”.
For outdoor setups, a minimum height of 16 feet (5 meters) is often recommended for basic performance. Industrial gateways, like the Milesight UG56, are built to handle extreme conditions, functioning in temperatures ranging from -4°F to +140°F (-20°C to +60°C), making them a solid choice for challenging environments across the U.S.
Pole Mounting Instructions
Pole mounting is the go-to method for outdoor installations. It accommodates various pole diameters using U-bolts, clamps, and brackets. U-bolts are a reliable and budget-friendly option for securing gateways to poles or masts, especially when paired with omnidirectional antennas.
Choose a pole location with an unobstructed line of sight to the sensors. Mount the gateway upright with antennas pointing vertically to maximize horizontal coverage. Secure cables along the pole with tie wraps to prevent wind damage and dangling. Avoid sharp edges during cable routing to prevent long-term wear. For power, PoE (Power over Ethernet) is ideal, as it combines power and data into a single cable. However, keep in mind that PoE injectors are not waterproof and must be stored in a dry area.
Proper cable management is crucial for outdoor setups. Indoor Ethernet cables degrade under UV exposure, so always use UV-resistant, outdoor-rated cables for external runs. BARANI DESIGN Technologies stresses:
“Outdoor cable rating is very important, otherwise, an indoor Ethernet cable will start to crack and disintegrate in the sun in a few months due to UV light exposure”.
Keep the coaxial cable between the gateway and antenna as short as possible to avoid signal loss. Before mounting, test the gateway and connection at ground level. Ensure all antenna slots are either in use or sealed with a 50 Ohm port terminator before powering the device; this prevents internal damage. Install surge arresters and outdoor-rated Ethernet lightning protectors to safeguard against power surges caused by lightning.
In situations where pole mounting isn’t feasible, rooftop or tower setups offer excellent alternatives for achieving height.
Rooftop and Tower Mounting Procedures
Rooftop and tower installations provide the best coverage but require careful attention to safety and stability. Position the gateway as high as possible, minimizing obstructions. Radio towers are ideal, but high rooftops or light posts work well too.
For flat rooftops, weighted mounting stands are recommended. These stands ensure stability during severe weather without penetrating the roof, which could lead to leaks or void warranties. As RAKwireless explains:
“Whenever the gateway is placed on a large, flat roof, it is also wise to use a mounting stand, as the building the gateway is standing on could potentially block the signal”.
Safety is non-negotiable when working at heights. Data Alliance advises:
“Installation of a LoRa antenna requires care because of the hazards of working at height and the risks of electrocution to yourself and others nearby”.
Avoid working in poor weather conditions, and use safety gear like non-metal ladders and rubber-soled shoes. For towers taller than 30 feet, it’s wise to hire professional installers with the right training and equipment.
When choosing antennas for rooftop setups, consider the terrain. High-gain antennas (8–12 dBi) extend signals farther but may overshoot nearby sensors. For uneven terrain or short-range needs, opt for lower gain antennas (3–5 dBi). Ensure the antenna with adequate clearance surrounding it to maintain signal quality. Protect connectors (typically N-type) with weatherproofing materials like sealants, tapes, or pitch pads to prevent corrosion and extend the gateway’s lifespan.
Mounting Hardware and Accessories
Getting the mounting hardware right is key to ensuring your setup stays stable and performs well over time. The hardware you pick can make the difference between a reliable installation and one that fails under challenging conditions. For outdoor setups, stainless steel or corrosion-resistant alloy components are a must. Indoor installations, on the other hand, can get by with simpler options like standard brackets and screws.
Outdoor setups often require additional accessories. For example, you might need high-gain omnidirectional LoRa antennas (with N-type connectors), GPS antennas (with TNC connectors), and LTE antennas. To protect against lightning damage, install lightning arrestors on both LoRa and GPS antennas. Also, safeguard unused antenna ports with 50 Ohm load terminators to protect the internal electronics.
For power and data, use PoE injectors paired with shielded, outdoor-rated CAT 5e or higher cables to ensure durability and data integrity. If your antenna needs to be placed remotely, opt for low-loss RF coaxial cables (around 10 feet long) to reduce signal loss. Grounding lugs and customer-supplied ground wires are essential for outdoor installations to protect both the equipment and anyone working nearby.
Mounting Kit Comparison
Here’s a quick comparison of popular mounting kits to help you choose the best option for your setup:
| Option | Pole Size Range | Included Hardware | Pros | Cons |
|---|---|---|---|---|
| L-Mount (Wall) | N/A (Wall) | Masonry plugs, screws, stainless steel bracket | Easy to mount; low-profile design | Signal blocked in one direction; requires masonry drilling |
| U-Bolt Kit (Pole) | Varies by bolt size | U-shaped threaded bolts, hex nuts, bracket | Affordable; allows 360° signal coverage | Needs an existing pole or mast for installation |
| Swivel Mount | Up to 1.75 inches | Articulated bracket, U-bolts | Highly adjustable; works on roofs, chimneys, and attics | More complex to install; limited to smaller mast sizes |
| Weighted Stand | N/A | Weighted base, vertical mast | Great for flat roofs; no drilling required | Bulky; can shift in extreme weather unless heavily weighted |
| I-Shaped Rod | N/A | Mounting rod, brackets, screws | Perfect for top-down mounting on flat surfaces | Needs a clear horizontal area for installation |
Prices for outdoor mounting kits can vary depending on the components included. For instance, RAKwireless offers outdoor LoRa gateway antenna kits (featuring an 8dBi antenna and LMR400 cable) priced between $61.00 and $100.00.
When setting up, remember to keep omnidirectional antennas in a vertical position. Also, maintain at least a 70-centimeter (27.5-inch) clear radius around the installation to ensure the best signal quality. Picking the right kit and accessories not only simplifies the installation process but also ensures your setup performs at its best.
Installation Guide
Follow these steps to ensure your LoRaWAN gateway is set up securely and functions reliably.
Pre-Installation: Grounding and Power Setup
Before starting, make sure the power supply and grounding are properly prepared. Most LoRaWAN gateways use Power-over-Ethernet (PoE) with CAT 5e or better cables, although some models can also work with DC power adapters. Important: Do not power on the gateway until antenna connections are properly installed.
For outdoor installations, protect your equipment from lightning damage by installing an Ethernet lightning surge arrestor between the outdoor cable and the indoor PoE injector. Additionally, attach a dedicated antenna surge arrester between the gateway and each antenna. BARANI DESIGN Technologies advises:
“An additional Ethernet lightning surge arrester be installed between the outdoor cable and splitter connection to protect all indoor electronics, like internet routers and cable modems”.
Since PoE injectors are not weatherproof, ensure they are placed indoors in a dry, safe spot. For external cable runs, always use outdoor-rated Ethernet cables, as indoor cables can degrade under UV exposure. Before proceeding to the roof, configure and test the system indoors near a registered sensor. This ensures your internet connection and LoRaWAN server registration are working correctly.
Once power and grounding are secured, you’re ready to mount the gateway.
Wall and Pole Mounting Instructions
For wall mounting, start by positioning the bracket horizontally and marking four spots for the holes on the wall. Drill holes about 1.25 inches deep (32 mm) with a 6 mm drill bit, insert wall plugs, and secure the bracket with screws. Attach the bracket-fixing screws to the back of the gateway, align them with the bracket slots, and slide the gateway down until it locks into place.
If you’re pole mounting, thread stainless steel straps or hose clamps through the bracket buckles. Wrap them tightly around a 2.5–3.5-inch pole and secure the lock. Then, slide the rear mounting screws into the bracket slots to secure the gateway. Connect the outdoor-rated Ethernet cable, ensuring all waterproof grommets and end-caps are tightly sealed. Use tie wraps to neatly secure the cables along the pole.
Make sure the antennas are positioned vertically upward for the best signal transmission. Milesight offers this critical reminder:
“Warning: Do not power up the gateway until installation is complete”.
Troubleshooting Mounting Problems
This section zeroes in on common mounting challenges and how to address them for better performance.
One frequent issue is physical instability, particularly on flat roofs. During severe weather, improperly anchored gateways can tip over. To counter this, use weighted mounting stands to keep the gateway secure. For extra protection against wind, heavy-duty L-brackets are a solid choice on flat surfaces.
Signal degradation is another common problem, often caused by cable and connector issues. Coaxial cables lose signal strength with every additional meter, so it’s crucial to use double-shielded, low-loss cables like LMR 200. Keep antenna cables as short as possible – ideally under 3.3 feet (1 meter) – to reduce signal attenuation. Urban areas present additional challenges, like the “Urban Canyon” effect, where concrete buildings can limit your range to 0.6–1.9 miles (1–3 km), compared to 9.3 miles (15 km) in open rural areas.
Antenna orientation is another critical factor. Omnidirectional antennas must be mounted perfectly vertical for optimal horizontal signal propagation. Even a slight tilt can significantly reduce coverage. Additionally, ensure there’s at least 27.6 inches (70 centimeters) of clear space around the antenna to prevent detuning caused by nearby objects or electronics.
Another issue to watch for is powering the gateway before all antenna ports are properly connected or terminated. This can damage internal components. RAKwireless emphasizes:
“port terminators make sure that the internal electronics do not burn through”.
For outdoor setups, moisture protection is vital. Seal all connectors with weatherproof tape and use proper cable glands at entry points to prevent water damage. Secure cables along the pole with tie wraps to avoid breakage from wind or sharp edges.
Here’s a quick reference table summarizing common mounting issues and their solutions:
| Issue | Common Cause | Recommended Solution |
|---|---|---|
| Unstable Mount | Wind/weather on flat roofs | Use weighted stands or heavy-duty L-brackets |
| Signal Loss | Long coaxial cables | Use low-loss (LMR 200) cables; keep length under 3.3 feet (1 m) |
| Reduced Range | Fresnel Zone obstruction | Increase mounting height to clear ground/obstacles |
| Cable Breakage | Sharp edges/unsecured cables | Secure with tie wraps; avoid abrasive surfaces |
Conclusion
Getting your LoRaWAN network set up correctly starts with proper mounting. Raising a gateway by just 33 feet (10 meters) can significantly improve coverage. The essentials? Keep the antenna high, clear of obstructions, and use short, low-loss cables to maintain signal strength.
As Data Alliance puts it:
“Antennas are critical to the performance of a LoRaWAN and optimal positioning and secure mounting will ensure the best signal propagation and coverage can be achieved”.
For smooth implementation, it’s important to choose hardware that matches your needs. CHOOVIO has options for every situation. If you’re working indoors, the compact Milesight UG63 Mini or the Dragino LPS8N gateways are solid picks. For outdoor setups, the rugged IP67-rated Milesight UG67 or the Dragino DLOS8N gateways provide strong long-range coverage in demanding environments.
Whether you’re navigating dense urban areas or wide-open rural spaces, the right mounting strategy can make all the difference in network performance. Check out CHOOVIO for gateways and accessories designed to meet a variety of deployment needs.
FAQs
How do I choose the best mounting spot for my gateway?
Picking the right spot for your gateway is key to ensuring it works effectively. For outdoor gateways, aim for elevated, open areas where the signal can travel freely without obstacles. Indoor setups, on the other hand, should steer clear of areas with lots of RF noise or thick walls that could block signals.
Make sure the chosen location is easy to access for maintenance, close to a power source, and, depending on the setup, shielded from weather or dust. For outdoor installations, a clear line-of-sight is especially important to maximize signal range and reliability.
What antenna gain should I use for my terrain and range?
If you’re aiming for optimal range, higher antenna gain works best in flat, open areas without obstructions. But here’s the thing: in most situations, simply raising the antenna height – about 10 meters or so – can make a much bigger difference than increasing the gain. The key is to prioritize placing your antenna at the right height to achieve the best possible performance.
What lightning and grounding protection do I actually need outdoors?
For outdoor LoRaWAN gateways, lightning protection – like arresters – and grounding systems are a must. These tools safely redirect lightning strikes, protecting your equipment from damage. Proper grounding also plays a key role in ensuring electrical safety and reducing electromagnetic interference. Together, these precautions help keep your LoRaWAN network reliable and durable, even in challenging outdoor conditions.

