

Ethernet Backhaul for LoRaWAN Gateways: Basics
If the wired link is down, the gateway is down – even if the LoRa radio looks fine.
When I set up Ethernet backhaul for a LoRaWAN gateway, I focus on a short checklist first: power, cable, IP address, DNS, default route, server settings, and firewall rules. The traffic load is small, but the link has to stay steady. A standard Ethernet run is limited to 328 feet (100 meters), and many gateways use 10/100BASE-T, RJ45, and sometimes PoE (802.3af) for both power and data.
Here’s the short version:
- Ethernet backhaul is the wired IP path from the gateway to the LoRaWAN Network Server (LNS)
- It carries uplinks, downlinks, status data, time sync, and admin traffic
- It does not set the radio plan, mount the antenna, or register the gateway by itself
- The gateway needs:
- an IP address
- DNS
- a default gateway
- the right LNS hostname/IP, protocol, and ports
- DHCP is simpler to start with; static IP is better when the network is fixed
- PoE can cut extra cabling, but switch power and port settings still need a check
- Security should include:
- a separate VLAN
- limited firewall rules
- HTTPS/SSH
- changed default passwords
- Common failure points are plain ones: bad cable, no DHCP lease, wrong DNS, blocked ports, or wrong gateway EUI
A few numbers matter here. Ethernet runs should stay under 100 meters / 328 feet. If NTP is blocked, UDP 123 may stop time sync. In some UDP-based packet forwarder setups, port 1700 is used in both directions.
Before I leave a site, I record these six items: Gateway EUI, final IP, firmware version, LNS endpoint, VLAN, and switch port. That small log can cut support time a lot later.
If you want the main idea in one line, it’s this: treat the gateway like both a radio device and a network device, and check the network side first.
Discover LoRaWAN! – How to start and setup a gateway – Dragino LPS8v2
sbb-itb-0e600ab
Requirements and Network Prerequisites
Once the Ethernet path is set, the next step is simple: make sure the gateway has the right hardware, power source, and network services to get online.
Hardware, Cabling, and Power
Your gateway needs an RJ45 Ethernet port with 10/100BASE-T (IEEE 802.3) support. Use Cat5e or better cabling, and keep each cable run under 328 feet (100 meters).
Power depends on where and how the unit is installed. Indoor models may use USB, a 12V DC jack, or an AC/DC adapter. For wall- or ceiling-mounted setups, Power over Ethernet (PoE) can send power and data through a single cable. If the gateway doesn’t support PoE on its own, add a PoE splitter. Outdoor installs need more protection: use a weatherproof IP67 enclosure and add grounding and surge protection on the Ethernet line. By contrast, indoor gateways are often rated IP30, which means they don’t have water protection.
DHCP, Static IP, DNS, and Routing
The local network must supply three basics: an IP address, DNS resolution, and a default gateway for upstream routing. DHCP can assign these settings for you, while static addressing means entering them by hand.
DHCP vs. Static Addressing
In plain English, DHCP is the easier option for setup, while static IP addressing makes more sense when the network plan is fixed and tightly managed.
| Feature | DHCP | Static IP |
|---|---|---|
| Setup Effort | Low – automatic assignment | Moderate – manual entry required |
| Address Management | Handled by router or DHCP server | Managed by network administrator |
| Best Use Case | Rapid rollout, larger deployments | Fixed infrastructure, predictable management |
| Primary Risk | IP may change after reboot or lease renewal | Duplicate IPs or routing errors if misconfigured |
If you go with static addressing, get the IP address, subnet mask, default gateway, and DNS servers from your network administrator before installation. Picking an address on your own can cause IP conflicts on the same subnet.
How to Connect and Configure Ethernet Backhaul
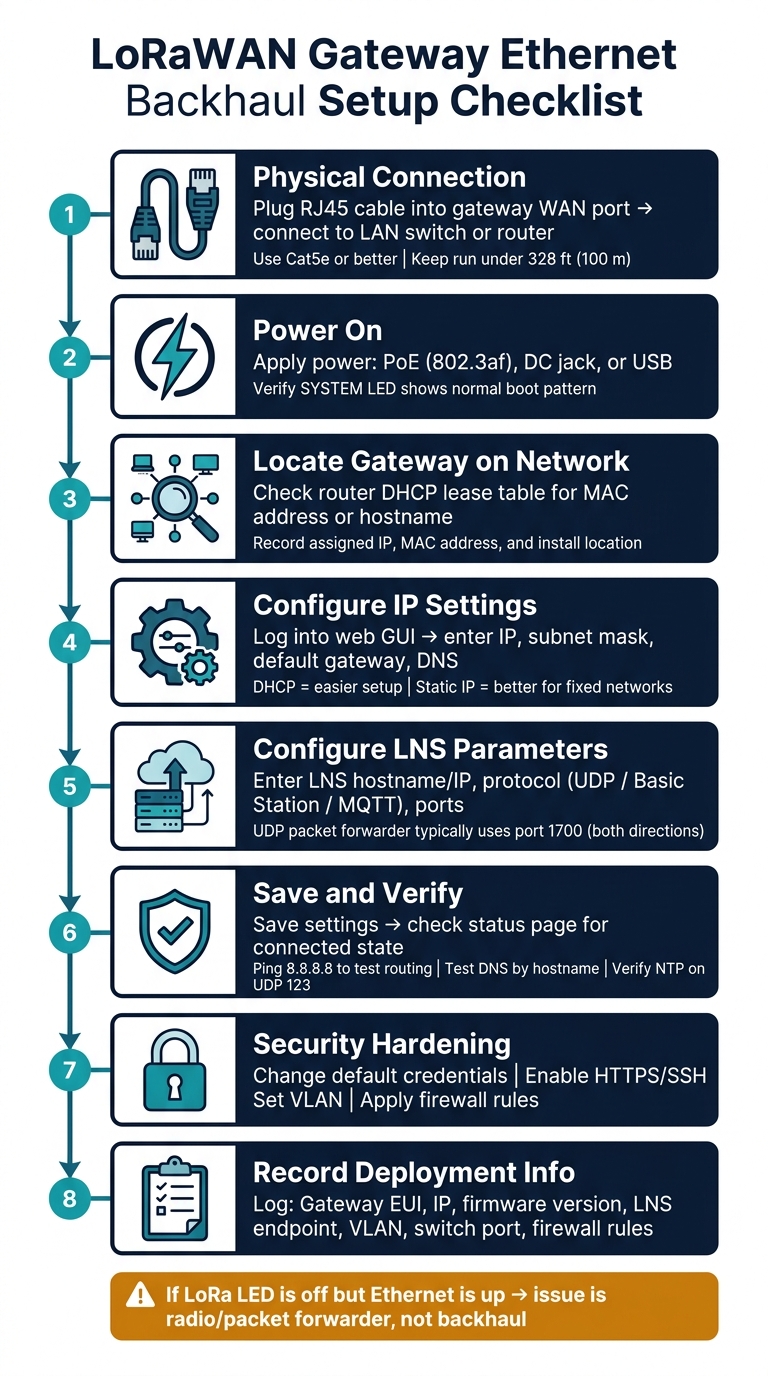
LoRaWAN Gateway Ethernet Backhaul Setup: Step-by-Step Checklist
Physical Connection and First Boot
Once you’re set, connect the gateway and make sure it starts up the way it should. Plug a standard RJ45 Ethernet cable into the gateway’s WAN or Ethernet port, then connect the other end to your LAN switch or router. Power it on using the option your model supports – PoE, a DC jack, or USB – and give it time to finish booting. Check the LED indicators while it starts. Some gateways use a SYSTEM LED to show boot progress and a separate light for radio status.
Next, find the gateway on your network. The usual path is to check your router’s DHCP lease list and look for the device by its MAC address, hostname, or serial number. Once you spot it, write down the assigned IP address, MAC address, and installation location before you move ahead.
If the gateway doesn’t get an address from DHCP, go through the basics first:
- Make sure the switch port is active
- Confirm the Ethernet cable works
- Check that the gateway has fully finished booting
- Verify the DHCP service still has leases available
Some models also include a direct-access fallback tied to that model. In that case, use the address listed in the product manual, then switch your network settings back to normal when you’re done.
IP Settings and Network Server Parameters
After the gateway shows up on the network, log in to its web interface and set the addressing values. Enter the IP address, subnet mask, default gateway, and DNS servers provided by your network administrator.
Then move to the LoRaWAN Network Server (LNS) settings in the packet forwarder or gateway menu. Enter the server hostname or IP address, the protocol, the required ports, and any gateway ID, login details, or TLS certificates the network server operator requires. Depending on the gateway and server, the link may use Semtech UDP, Basic Station, or MQTT. For example, a UDP setup may use port 1700 in both directions.
When you’re done, click Save or Apply. Reboot only if the interface tells you to. After that, check the status page and make sure the gateway shows a connected state.
Deployment Notes for CHOOVIO-Supplied Gateways
Gateway firmware and port labels can differ from one model to another, so it helps to double-check the product manual before you lock anything in. For CHOOVIO-supplied gateways, use the model guide to confirm port naming, PoE input, fallback access, and supported LNS parameters.
Benefits, Limits, and Security Controls
Benefits and Limits of Ethernet Backhaul
Once cabling and IP setup are done, the practical question is simple: is Ethernet the right backhaul for this site?
For fixed LoRaWAN gateways, Ethernet is often a strong fit. It works well when you need a stable link with little day-to-day upkeep. It can also hold up well in hard indoor locations like basements, underground parking structures, and elevator shafts. And with PoE, you can carry power and data over one cable, which helps a lot in cramped or remote installs.
Still, Ethernet comes with tradeoffs. The 328-foot (100-meter) cable limit can make placement harder than it looks on paper. On top of that, many indoor gateways are IP30-rated, which can narrow your options for both gateway and antenna placement. And if the cable is damaged or the switch fails, the gateway can go offline unless you have a backup backhaul in place.
| Characteristic | Ethernet Benefit | Implementation Consideration |
|---|---|---|
| Connectivity Stability | Low latency, predictable performance | Limited to 328 ft (100 m); requires physical port availability |
| Power Management | PoE combines power and data on one cable | Requires a PoE switch or injector |
| LAN Integration | Works with centralized IT monitoring | Requires a dedicated VLAN for isolation |
| Environmental | Stable in demanding indoor sites | Requires protected placement |
| Redundancy | Primary link in a multi-backhaul setup | Cable damage is a single point of failure |
| Placement | Useful where RF coverage is difficult | Antenna placement may be constrained by cable reach |
Once you decide to use Ethernet, the next step is to keep that link separate from the rest of the LAN.
Network Segmentation and Access Control
Putting a LoRaWAN gateway straight onto the main corporate LAN adds risk you don’t need. A safer setup is to place the gateway on a dedicated VLAN, so its traffic stays away from business systems that matter more. Then set firewall rules to allow only the outbound connections the gateway needs.
Admin access should be locked down too. Only approved users should be able to reach the gateway’s web interface. Where the platform supports it, turn on ACLs and MAC binding.
Secure Management Practices
A few basic habits can prevent a lot of trouble. Change default credentials right away. For remote management, use HTTPS or SSH instead of leaving the interface exposed in a weaker state.
Firmware should stay current. Many industrial gateways support secure boot through signed firmware, along with secure storage for keys and certificates. It also makes sense to use centralized management rather than exposing each gateway interface directly to the public internet. And if the wired network is shared or not fully trusted, an OpenVPN or IPsec tunnel can add end-to-end encryption to the backhaul.
Put these controls in place before you start connectivity testing.
Testing, Troubleshooting, and Key Takeaways
Validation Steps After Setup
Once the gateway is connected, do a quick check before you call the job finished. Work from the physical layer up: cable first, server last.
Start at the port. Make sure the RJ45 cable is fully seated and the switch port LEDs show an active link. If the gateway uses PoE, confirm the switch or injector is supplying 802.3af power. The gateway’s SYSTEM LED should show the normal boot pattern for your model. Then open the web GUI and verify that the gateway has a valid IP address and a working default route.
Next, test DNS. If the gateway can ping 8.8.8.8 but can’t reach the server by hostname, the issue is DNS. Check SNTP too. If time isn’t syncing, review the logs and make sure UDP port 123 or the NTP server is allowed through the firewall. After that, sign in to the network server and verify that the gateway is online and forwarding uplinks and downlinks.
Common Faults and Corrective Actions
This table helps you pinpoint the failure point fast.
| Symptom | Likely Cause | Verification Step | Corrective Action |
|---|---|---|---|
| No Ethernet link LED | Faulty cable or port, or no PoE power | Swap cable; check switch port status and PoE injector | Replace the RJ45 cable or verify the 802.3af PoE source |
| No IP address | DHCP failure or IP conflict | Check the DHCP lease table on the router or try a static IP | Assign a static IP within the correct subnet or fix the DHCP server issue |
| Local interface unreachable | Subnet mismatch | Move your laptop to the gateway’s subnet, then ping the gateway IP | Ensure your management device is on the same subnet |
| DNS failure | Incorrect DNS settings | Ping 8.8.8.8 versus a hostname from the CLI |
Update DNS settings to 8.8.8.8, 1.1.1.1, or your local provider |
| Network server shows "Offline" | Wrong server address, port, or Gateway EUI | Verify packet forwarder settings and EUI registration | Correct the server URL and port, then re-register the Gateway EUI |
| Uplinks not forwarding | Firewall or ACL blocking outbound traffic | Check port mapping and ACL rules | Open the required outbound ports to the network server |
| Intermittent disconnections | PoE power budget exceeded or duplex mismatch | Check PoE switch wattage output and port speed settings | Use a dedicated PoE injector and set the port to auto-sensing |
If the LoRa LED is off while Ethernet is up, the problem is in radio startup or the packet forwarder, not the backhaul.
Conclusion: What to Record and Remember
Ethernet backhaul is the gateway’s wired IP path to the network server. Getting it right comes down to a few basics: stable power, a good cable, correct IP settings, working DNS, clear routing, open firewall rules, and proper registration on the network server.
Before you leave the site, record:
- Gateway EUI
- Final IP address
- Firmware version
- Network server endpoint and protocol
- VLAN
- Switch port
- Firewall rules
For CHOOVIO-supplied gateways, keeping this record up to date makes remote support easier later. A complete deployment record also cuts troubleshooting time.
FAQs
When should I use DHCP or a static IP?
DHCP is the best fit for most installs. It assigns an IP address automatically, which makes setup simpler and helps avoid configuration mistakes.
Use a static IP for professional or industrial deployments that need steady, predictable access to the gateway’s web management portal. With a static IP, the gateway address won’t change if the router hands out a different IP later.
What ports must be open for the gateway to work?
The documentation doesn’t list any specific network ports that must be open for a LoRaWAN gateway to work.
For steady operation, make sure the gateway has a stable Ethernet connection to your router on the same network segment. It also needs to be registered correctly in your network server console using its Gateway EUI and the right frequency plan, such as US915 for deployments in the United States.
How can I tell if the problem is Ethernet or radio?
First, make sure the Ethernet backhaul connection is stable and set up the right way. Also check that the gateway and router are on the same network segment.
If you notice packet loss, look for physical obstacles or nearby devices that may be causing interference. Up to 10% packet loss can be normal. But if the loss is higher, or your coverage suddenly drops in a big way, the issue usually comes from RF interference or poor gateway placement, not Ethernet.

