

How LoRaWAN Simplifies Asset Tracking in Agriculture
If you need to track farm equipment across large acreage, LoRaWAN can be a cost-effective way to do it. We’d boil it down like this: a well-positioned outdoor gateway can provide several miles of coverage in open rural environments, trackers can last years on battery power, and you don’t need a cellular plan on every asset.
Here’s the short version of what matters:
- What it solves: finding tractors, trailers, tanks, bins, and other gear spread across fields, yards, and barns
- Why it fits farms: long-range, low-power wireless connectivity using regional LoRaWAN frequency plans, with no cellular subscription required for each asset
- What you need: trackers, gateways, internet backhaul, a network server, and a dashboard
- What to plan first: use case, acreage, routes, dead zones, budget, power, and internet at each site
- What to buy: outdoor or indoor gateways, GPS trackers, door sensors, and storage monitors based on each asset
- What to watch after setup: signal gaps near hills or metal buildings, battery drain, and reporting intervals that are too frequent
Hardware costs vary by gateway, tracker, connectivity options, and environmental requirements. Outdoor and cellular-enabled gateways generally cost more than basic indoor models, while tracker pricing varies based on GPS, battery capacity, solar charging, environmental protection, and other features.
What we like about this setup is that it stays simple. You map the farm, place gateways high, use motion-based reporting, build geofence alerts, and check battery and antenna status through the season. That’s the core of it.
In short: if you want farm asset tracking without building Wi-Fi across every field or paying for full cellular coverage on every machine, LoRaWAN is a practical fit.
WEBINAR: How LoRaWAN® and the IoT Enable Smart Farm Management
sbb-itb-0e600ab
How LoRaWAN Asset Tracking Works in Agriculture
A tracker mounted on an asset sends LoRaWAN data to a nearby gateway using the appropriate regional frequency plan, such as US915 in the United States. The gateway then passes that data to a network server and dashboard.
What Counts as an Agricultural Asset
In agriculture, a lot of equipment and storage items can be tracked this way. That includes mobile equipment like tractors, combines, and UTVs. It also covers transport gear such as trailers and grain carts, storage assets like fuel tanks and irrigation pumps, and fixed infrastructure including grain bins, cold rooms, and chemical sheds.
The type of asset and where it sits matter when picking the tracker. In some cases, a solar-powered unit makes sense. In others, a high-capacity battery tracker is the better match.
How Data Moves From Tag to Dashboard
A simple LoRaWAN setup has five parts:
| Component | Role |
|---|---|
| Asset Tracker | Collects GPS or sensor data, transmits via LoRa radio |
| Gateway | Receives LoRa signals, relays them to the internet |
| Backhaul | Connects gateway to the internet |
| Network Server | Manages device credentials and data routing |
| Dashboard | Displays locations, history, and sends alerts |
Some trackers also store data locally. So if an asset moves outside gateway range, the tracker can save location data and upload it later when coverage comes back. That can be a big help in remote fields, where coverage may come and go.
Why LoRaWAN Works Well on Large Farms
The big draw is coverage. A well-placed outdoor gateway can provide several miles of coverage in open rural terrain, although actual range depends on terrain, antenna placement, installation height, obstructions, interference, and the end devices being used. On top of that, trackers with built-in accelerometers can stay in a low-power sleep mode until they detect motion, which helps battery life last much longer.
For large farms, that means broad coverage, long battery life, and less hands-on upkeep.
Planning a LoRaWAN Tracking System for Your Farm
Before you buy anything, get clear on four things: the job you need the system to do, the area it needs to cover, what you want to spend, and how each site will get power and internet.
Define Use Cases and Success Metrics
Start with the exact tracking problem. That one decision drives the hardware choices that come next.
Common farm use cases include tracking tractors across fields, getting an alert when a trailer moves after hours, tracking hauling equipment and time on site during harvest, and watching fuel tank levels so you can spot theft early.
| Use Case | Key Success Metric |
|---|---|
| Equipment location across fields | Reduced search time; better daily utilization |
| Trailer or fuel-tank theft alerts | Fewer losses; immediate after-hours movement alerts |
| Hauling and time on site | Faster harvest workflows; route optimization |
| Storage condition monitoring | Reduced spoilage; automated temperature and humidity alerts |
Set your metric before you buy. If the goal is to cut equipment search time, write that down. That gives you a simple way to tell if the system is doing its job.
Your use case also shapes the tracker type, how often it reports, and which alert rules make sense.
Map Acreage, Routes, and Coverage Needs
Once you know what you’re tracking, map where those assets actually sit and move.
List every farmstead, remote field, barn, grain bin, storage yard, and cold room. Note the distances between them in miles and feet. Then sketch the usual routes your equipment follows during planting and harvest.
As you map things out, mark problem spots too:
- Hills
- Tree lines
- Metal buildings
- Long route sections that may need extra gateways or higher mounting points
This step sounds simple, but it saves headaches later. A tracker that works near the shop may struggle once a machine drops behind a hill or moves past a metal building.
Set a Hardware Budget
With the map in front of you, you can put real numbers to the project.
As a rough guide, outdoor gateways typically cost more than indoor models due to their weather-resistant construction and connectivity options. Tracker pricing varies based on features such as GPS, solar charging, battery capacity, and environmental protection, while door, security, temperature, and humidity sensors are generally lower-cost components. For current pricing, refer to the individual product listings.
A smart way to start is small. Put hardware on your highest-value assets or the items that waste the most time when they go missing. Proving ROI on one tractor or one fuel tank usually makes more sense than outfitting the whole farm in one shot.
Check Power and Backhaul at Each Site
Every gateway needs power and a backhaul connection to the LoRaWAN network server. This is commonly provided through Ethernet, Wi-Fi, or cellular connectivity depending on the gateway and site.
Visit each planned gateway location and confirm both before you lock in placement. For remote fields or pastures without grid power, a properly sized solar panel, battery, and charge controller can provide an off-grid power solution. If wired internet isn’t available, a gateway with cellular backhaul can provide connectivity, subject to cellular coverage and the selected data plan.
Once power and connectivity are mapped for each site, the next move is choosing the right gateways, trackers, and enclosures for those conditions.
Selecting Hardware and Network Components
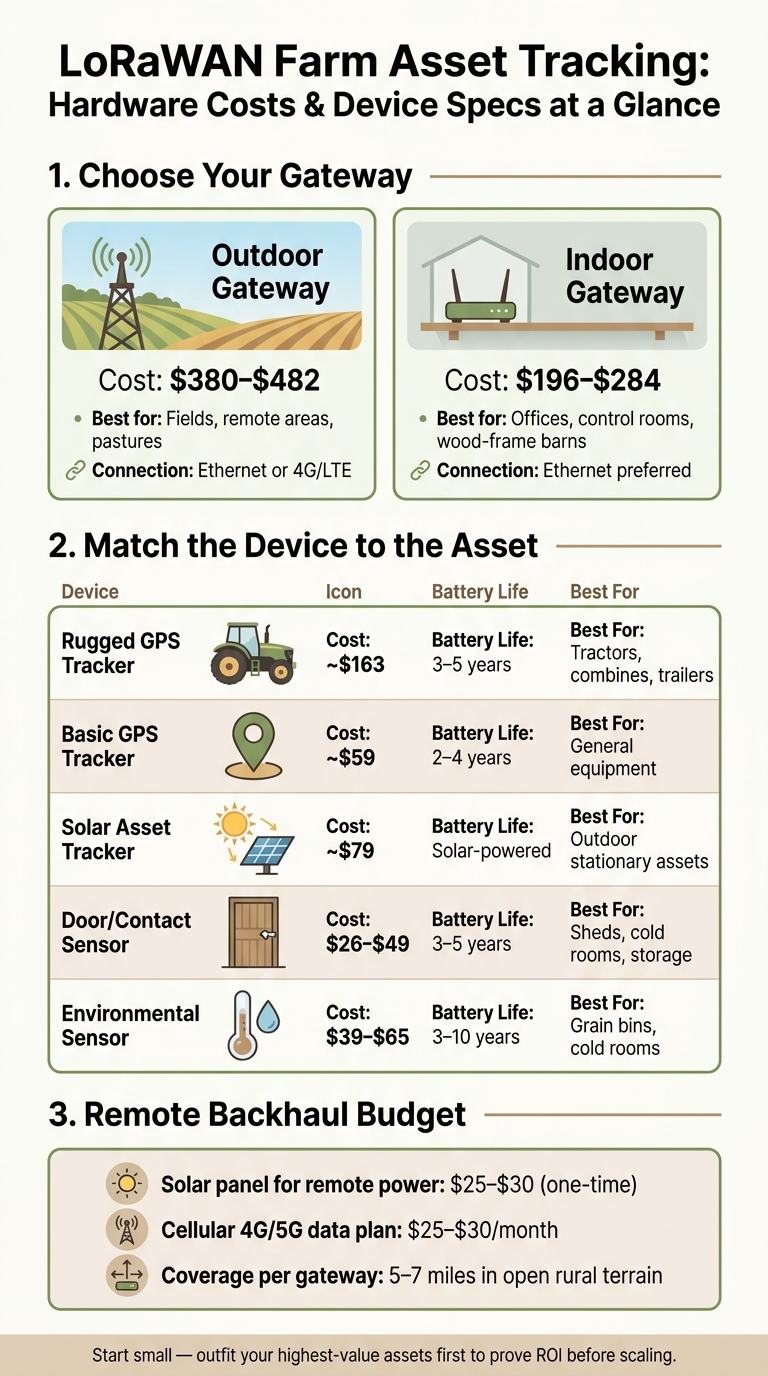
LoRaWAN Farm Asset Tracking: Hardware Costs & Device Specs at a Glance
With your coverage map and budget in place, the next step is to pair each part of the farm with the right hardware. The main idea is simple: pick devices based on how far an asset moves and how fast you need to know something changed. Start with coverage, then choose the simplest hardware that does the job.
Choose Gateways for Fields, Barns, and Storage Areas
Start by matching each site to either an indoor or outdoor gateway. Indoor gateways work well in offices, control rooms, and nearby wood-frame barns. Outdoor gateways are a better fit for fields and remote areas.
It helps to think about where equipment and materials actually move. Fields, barns, and storage yards don’t all behave the same way, so they shouldn’t all use the same setup.
Match the gateway to the internet connection at that site:
- Use Ethernet where wired internet is available.
- Use 4G/LTE cellular backhaul where wired internet is unavailable and cellular coverage is sufficient.
Large farms often need more than one outdoor gateway to cover separate yards, fields, and pastures. Metal buildings and other RF obstructions can create coverage gaps, so an additional gateway or different gateway placement may be needed after site testing.
Once coverage is handled, you can match each asset to the lightest tracker that still meets its reporting needs.
Match Trackers and Sensors to Each Asset
Not every asset needs a GPS tracker. Picking the right device for each job keeps costs lower and helps batteries last longer. The considerations below are typical for farm deployments and vary by device, reporting interval, battery capacity, and site conditions.
| Device Type | Typical Use | Reporting / Power Considerations | Mounting Method | Indoor/Outdoor |
|---|---|---|---|---|
| Rugged GPS tracker | Tractors, combines, trailers | Battery life varies significantly with GPS and reporting frequency | Bolted brackets or strong magnets with a safety tether | Outdoor (IP67 or better) |
| Compact asset tag | Tools, small implements, seed and fertilizer bins | Low-power periodic or event-based reporting | Adhesive pads, zip ties, screw clips | Indoor or outdoor depending on the device’s environmental rating |
| Environmental sensor | Cold rooms, walk-in coolers, grain bins | Periodic reporting; multi-year battery options available | Wall bracket or inside a protective enclosure | Indoor or sheltered outdoor |
| Door/contact sensor | Shed doors, equipment storage, cold room doors | Event-based reporting helps conserve battery | Screw-mounted to the frame and door | Indoor or covered outdoor |
For tractors, trailers, and other exposed equipment, consider a rugged GPS tracker with an appropriate outdoor IP rating and motion detection. That gives you a nice balance: the tracker reports more often when the asset is moving, then drops back to a low-power heartbeat when parked. You still get useful data, but you don’t burn through the battery for no reason.
Reporting intervals for cold rooms, grain bins, and other storage applications should be selected based on how quickly conditions can change, alert requirements, battery-life goals, and applicable operational or regulatory requirements. That’s usually enough to catch trouble early while still getting multi-year battery life from standard AA or AAA batteries.
After you choose the devices, register them in the network server before you install anything.
Set Up the Network Server and Device Credentials
For OTAA activation, devices are provisioned using identifiers and credentials such as the DevEUI, JoinEUI (historically called AppEUI), and AppKey. LoRaWAN 1.1 devices also use a NwkKey, depending on the device and network-server configuration.
OTAA (Over-the-Air Activation) is generally preferred over ABP for new LoRaWAN deployments because it supports dynamic session-key generation and simplifies secure device provisioning and management.
A simple spreadsheet goes a long way here. Track each device’s ID, asset type, location, and install date so you don’t end up guessing later.
Choose Mounting and Enclosure Materials
Bad mounting choices can cost more than the hardware itself once failures start happening in the field. For outdoor installations, select a gateway with an appropriate outdoor environmental rating, such as IP65 or IP67, or use a suitable weather-resistant enclosure where required.
Brace mast installations for wind. Use properly rated weatherproof cable entries, glands, and seals to maintain the environmental protection of the installation. Add surge protection at each gateway, especially on elevated masts, to help protect against lightning during summer storms.
Large metal sheds or cold rooms may also need an extra indoor gateway to remove signal dead zones. Small details like these are often what keep a farm network from turning into a maintenance headache.
Deploying, Configuring, and Running the System
This stage is where the plan turns into day-to-day use. Install the system, check coverage, and dial in reporting so asset data reaches the dashboard without gaps. The coverage map, asset list, and reporting goals you already set should guide each step.
Install Gateways and Verify Coverage
Place outdoor gateways in elevated, unobstructed locations where practical. The appropriate mounting height depends on terrain, surrounding structures, antenna configuration, coverage requirements, and manufacturer installation guidance. Height matters here. A gateway tucked too low behind buildings or trees can leave you chasing spotty reports later.
Once the gateway is online, test it in the places that matter. Walk or drive a tracker through fields, barns, yards, and the routes you want to watch. As you move, check the dashboard for RSSI and SNR. Use RSSI, SNR, packet reception, and repeated field tests to identify weak or unreliable coverage areas.
Some trackers store data locally and upload it once coverage comes back. That can help you map weak spots without losing the trip record entirely.
If a barn or storage building blocks signal, move the gateway or install another one for better coverage and backup.
Register Devices and Set Reporting Intervals
Configure the gateway and network server for the appropriate regional LoRaWAN frequency plan, such as US915 regional frequency plan (902–928 MHz) for deployments in the United States. After that, register each tracker using OTAA credentials. If your distributor already loaded those credentials, import them instead of typing them in by hand. It saves time and cuts down setup mistakes.
After each tracker joins the network, make sure it’s sending data before you move to the next device. That one small check can save a lot of backtracking.
Then set reporting intervals based on how the asset moves in the field, not how you wish it moved:
- Use faster reporting for moving assets
- Use slower reporting for parked assets
A tractor in motion and a trailer sitting in a yard do not need the same update schedule.
Build Maps, Alerts, and Daily Workflows
Once devices start reporting, the raw location data needs a job to do. Turn it into daily checks and alerts your team can act on.
Set up geofences around fields, storage yards, and equipment lots. If a high-value asset crosses a boundary, the monitoring platform can generate alerts through supported notification methods, such as SMS, email, or push notifications. You can also pair geofences with door-opening alerts on cold rooms and storage sheds. That gives you a clearer view of after-hours activity instead of a string of location pings with no context.
Build a dashboard that shows:
- Current locations
- Movement history
- Active alerts
That way, the dashboard becomes something people can glance at and use, not just a screen full of dots.
Operate and Maintain the System Over Time
Once the alerts and dashboard are set, daily use is pretty simple. The harder part is keeping the system steady through the year.
During harvest, increase reporting frequency for equipment that’s moving a lot. In winter, switch most trackers to a low-power heartbeat so batteries last through long stretches of inactivity.
Establish a periodic maintenance schedule for gateway mounts, antennas, power systems, and device batteries based on the installation environment and operating requirements. While you’re at it, review battery levels in the dashboard and replace any trackers showing low voltage before they stop reporting out in the field. It also helps to keep alert rules and reporting cadence tied to the season, so the system matches what’s happening on the farm instead of running on a one-size-fits-all schedule.
Common Problems and Practical Fixes
After deployment, most farm tracking problems come down to coverage gaps or reporting settings. Once the system is live, it helps to focus on the small set of failures that show up again and again on farms.
Weak Coverage in Remote Fields or Metal Buildings
Missing data usually starts with low antenna placement or metal getting in the way. If a tracker drops out at barn entrances or near field edges, check the RSSI inside the structure and then outside it. That side-by-side check often tells you a lot fast.
If metal is blocking the signal, move the antenna away from the obstruction. You can also add an indoor gateway for blocked buildings. And if one gateway can’t reach through metal or uneven ground in a steady way, add a second gateway.
If coverage seems fine but updates still fail, power use is often the next thing to check.
Short Battery Life or Missed Updates
Common causes of shorter-than-expected battery life include reporting too frequently and operating under poor radio conditions. GPS acquisition, retransmissions, confirmed uplinks, transmit power, data rate, and other device settings can also affect battery consumption.
A simple fix is to switch to motion-based reporting. That way, the tracker sends frequent updates only when it’s moving and sleeps when it’s still.
Troubleshooting Checklist
Use this checklist to isolate the fault before replacing hardware.
| Issue | Likely Cause | Fix |
|---|---|---|
| Device not joining | Incorrect credentials, frequency-plan mismatch, configuration issue, or insufficient coverage | Verify credentials and regional frequency settings; confirm gateway connectivity and test closer to the gateway if needed |
| Location gaps on map | Temporary coverage loss | Use trackers with onboard datalogging that uploads once coverage returns |
| Rapid battery drain | High reporting frequency or weak signal | Reduce reporting frequency; enable motion-based triggers |
| Weak signal inside barns | Metal shielding blocking signal | Mount antenna outside; add a second indoor gateway |
| Gateway offline | Backhaul failure | Verify cellular subscription is active or Ethernet is connected |
| Parked asset appears to move | Low satellite count or signal reflection | GPS position drift can make a stationary tracker appear to move; accelerometer sleep is only one possible mitigation |
Conclusion: Key Steps for a Reliable Farm Tracking Setup
A reliable LoRaWAN tracking system comes down to four choices: use case, coverage, hardware, and maintenance. Keep the hardware list tight and focused on the assets that matter most – equipment moving between fields and storage assets moving between yards – and the budget is more likely to stay in check.
Before you place gateways, map out obstacles like tree lines, metal buildings, and uneven ground. Then test coverage before you lock in final placement. That extra step can save a lot of headaches later.
For outdoor deployments, select gateways and enclosures with environmental ratings appropriate for the installation, such as IP65, IP66, or IP67 depending on exposure conditions. Just as important are the reporting rules. Motion-based intervals let trackers report more often when assets are moving and save battery life when they’re standing still.
Season changes can chip away at system performance. Mark sensor locations before harvest traffic starts. Check batteries on a regular basis. Where supported, use remote device and gateway management features to reduce unnecessary field service visits. That helps keep the system useful from planting through harvest.
LoRaWAN gives farms wide-area tracking with a small network footprint and low upkeep.
FAQs
How many gateways does my farm need?
In some cases, one well-placed outdoor gateway may cover much of a farm. Actual coverage and device capacity depend on terrain, obstructions, antenna placement, reporting frequency, payload size, spreading factors, downlink traffic, and the gateway being used.
The exact number depends on your farm’s layout, terrain, and anything that gets in the way, like trees or buildings. A smaller farm may only need one gateway. A larger site, or one with more complicated ground and obstacles, may need more than one to get full coverage and keep the system dependable.
Will LoRaWAN work in hilly areas or metal barns?
Yes, but hilly terrain and metal barns can hurt signal performance.
Hills can block line of sight. Metal structures can also interfere with the signal, which may lead to weaker coverage or less steady connectivity.
To improve connectivity, start with a site survey. Then place the gateway and antenna in an elevated, unobstructed location where practical, with final placement based on terrain, surrounding structures, site testing, and manufacturer installation guidance.
How often should asset trackers report?
Reporting frequency depends on what your operation needs and on the device options you choose through CHOOVIO. For example, moving equipment may require more frequent location updates, while parked equipment can use longer heartbeat intervals to conserve battery.
Many devices support periodic, timed, and motion-based reporting. To help extend battery life, trackers can send updates more often when motion is detected and switch to a low-power state when they’re not moving.

