

How to Set Up LoRaWAN Sensors in Smart Buildings
LoRaWAN sensors are an effective way to monitor and manage smart buildings. They track data like temperature, humidity, water leaks, and occupancy while using minimal power. Here’s a quick summary of how to set up these sensors:
- Hardware Needed: Sensors (e.g., Dragino LHT52 for $39.00), a LoRaWAN gateway (e.g., Moko Smart Gateway for $250.00), and batteries.
- Software Tools: Use platforms like The Things Network (TTN) for configuration and Chirpstack to set up your LoRaWAN network.
- Steps:
- Install Gateway: Place it in a central, elevated spot with reliable internet.
- Register Sensors: Add each sensor to the network using unique IDs like DevEUI.
- Place Sensors: Position based on their function (e.g., door sensors near entry points, humidity sensors away from heat sources).
- Test Connectivity: Check signal strength and data transmission in the network console.
- Monitor Data: Use dashboards to analyze and act on sensor data.
LoRaWAN’s long range (up to 9 miles in rural areas) and low maintenance make it ideal for smart building management. CHOOVIO offers over 200 sensor options tailored to various needs, with battery life lasting 5–10 years. By starting with a few sensors and expanding gradually, you can improve building safety, efficiency, and comfort while reducing costs.
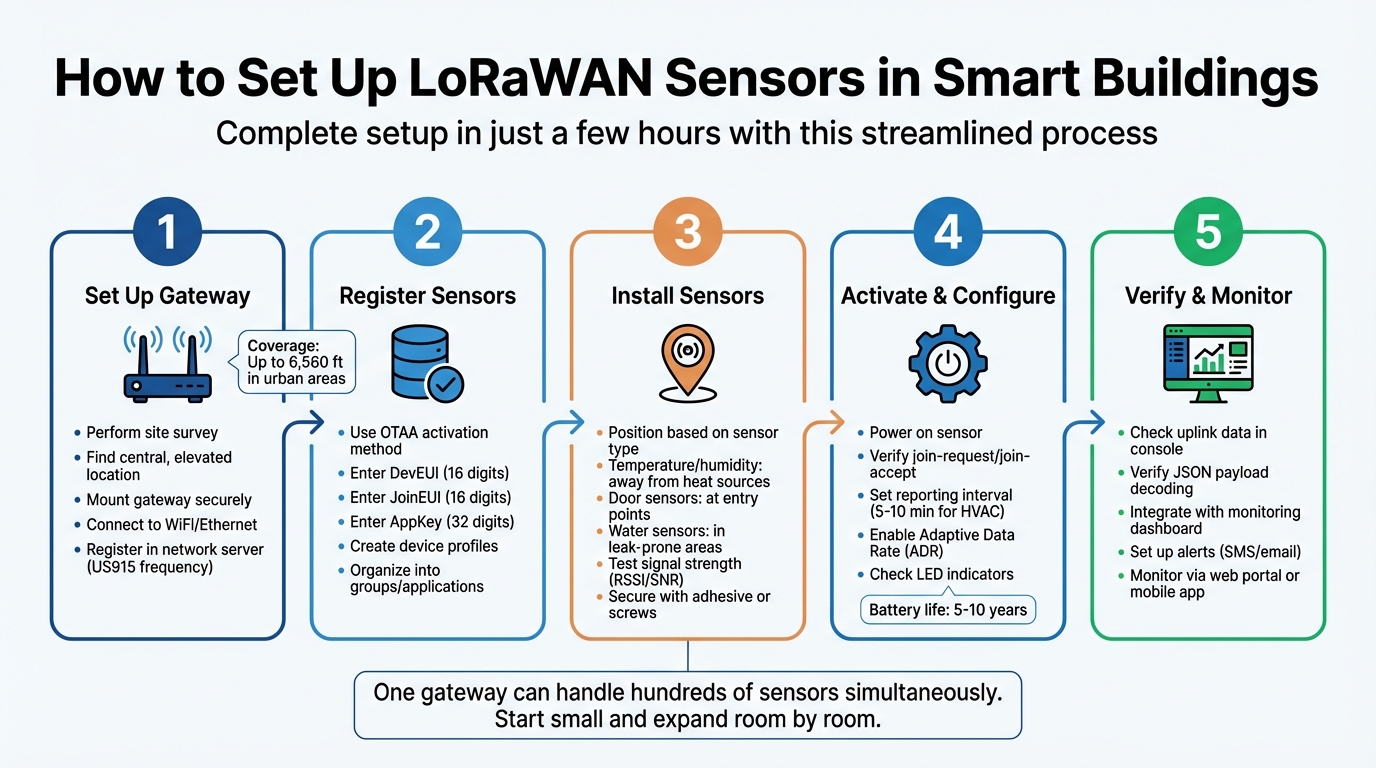
5-Step LoRaWAN Sensor Setup Process for Smart Buildings
Connect Your First LoRaWAN Device – Fast & Free!
Prerequisites and Required Components
Before diving into the installation process, make sure you have the right hardware and software lined up. A LoRaWAN network functions across three main tiers: end-node sensors that gather data, gateways that relay this data to the cloud, and a network server that oversees the devices. CHOOVIO offers solutions to cover all these tiers seamlessly.
Hardware from CHOOVIO

Choosing the right hardware depends on your specific monitoring needs:
- Environmental Monitoring: Use the Dragino LHT52 ($39.00) for tracking temperature and humidity, or the AM103 ($190.00) for monitoring CO2 levels.
- Security and Safety: The Dragino LDS02 door sensor ($22.00) keeps tabs on door activity, while the RA02A wireless smoke detector ($69.00) adds fire safety to your setup.
- Water Damage Prevention: The Dragino LWL04 ($33.00) detects leaks and is powered by a CR123A battery, lasting 2–10 years with 16,000–70,000 uplink packets.
You’ll also need at least one gateway to connect your sensors to the internet. For smart building setups, the Milesight UG65 Gateway ($762.99) is a solid choice with WiFi backhaul. If you’re looking for a more budget-friendly option, the Dragino LPS8N Indoor Gateway ($196.00) fits the bill. For locations without reliable wired internet, consider gateways with cellular LTE (3G/4G/5G) connectivity. Keep in mind that a cellular subscription typically costs around $25 to $30 per month.
Once you have your hardware, you’ll need to configure everything using the appropriate software tools.
Software Tools for Configuration
On the software side, a LoRaWAN Network Server is essential for routing data from your gateway to the cloud. A popular choice is The Things Network (TTN), a free platform widely used for initial deployments. Using TTN’s configuration console, you can register your gateway and add sensors by entering their unique DevEUI and JoinEUI identifiers – these come pre-loaded with CHOOVIO sensors, simplifying the setup process.
Step 1: Set Up LoRaWAN Network and Gateway
Perform a Site Survey
Start by surveying your building to find the best location for your gateway. Look for a central, elevated spot that’s clear of obstacles like thick walls or metal structures, as these can block radio signals and limit coverage. In urban areas with dense infrastructure, you might get a range of a few kilometers. In contrast, open spaces with minimal obstructions could allow coverage up to 10 kilometers.
To get a better idea of your potential coverage, use a LoRaWAN Signal Strength Calculator and factor in your building’s layout. If your facility is large, test the network by placing a sensor in the most distant corner of the building. Then, check the signal stability through the network server’s test panel before you finalize the gateway’s placement.
Make sure the site has reliable WiFi or Ethernet connectivity. If a wired connection isn’t dependable, consider gateways with Cellular LTE (3G/4G/5G) backhaul as an alternative. Also, ensure there’s a consistent power supply at the site. Using a surge protector or an uninterruptible power supply (UPS) is a good precaution to protect against power interruptions. Once everything checks out, you can move on to installing and registering the gateway.
Install and Register the Gateway
After identifying the ideal location, securely mount the gateway. For indoor setups, a high shelf or a wall bracket works well. If it’s an outdoor installation, make sure to use a tamper-resistant, weatherproof enclosure to protect the gateway from environmental elements and unauthorized access. Connect the gateway to power and link it to the internet using Ethernet or WiFi.
Next, log into your network server console to register the gateway. You’ll need to enter its unique Gateway EUI, which is usually printed on the device or included in its documentation. Set the frequency plan to US915 to comply with U.S. regulations. Once you save the configuration, the gateway should appear as “connected” in the console within a few minutes, signaling that it’s ready to transmit data from your sensors to the cloud.
Step 2: Register Sensors in the Network Server
Enter Sensor Details into Console
Once your gateway is online, the next step is to add your CHOOVIO sensors to the network server. The recommended method is Over-the-Air Activation (OTAA), which periodically updates encryption keys to ensure secure communication. To register each sensor, you’ll need three key identifiers: the DevEUI (16 digits), the JoinEUI (AppEUI, also 16 digits), and the AppKey (32 digits). These details are typically printed on the sensor’s label or included in the documentation provided by CHOOVIO.
Start by creating a Device Profile in the network server. This profile sets parameters such as the LoRaWAN MAC version, regional configurations (set to US915 for the United States), and OTAA as the activation method. When entering the DevEUI, check whether your console requires the format to be in MSB or LSB and adjust accordingly using the toggle option if available. If you’re working with multiple sensors, save time by uploading a CSV file that includes all DevEUIs and their corresponding keys. This approach minimizes manual entry errors and speeds up the process.
Once registration is complete, power on the sensor and navigate to the “LoRaWAN frames” tab. Look for a JoinRequest followed by a JoinAccept message. These messages confirm that the sensor has successfully authenticated and is ready to start transmitting data. Afterward, organize your registered sensors to simplify ongoing management.
Organize Sensors into Groups
To keep your sensors well-organized, use Applications within the network server. Applications act as logical groupings for devices that share a similar function. For instance, you might create one application for HVAC monitoring sensors and another for water leak detection. Grouping sensors this way makes it easier to manage data streams and integrate specific groups with external dashboards.
During registration, you can also assign tags or labels to each sensor, adding metadata like “Floor-3” or “Zone-B” to indicate its exact location in a building. This not only speeds up troubleshooting but also allows you to analyze data by specific zones or floors. If you’re managing sensors across multiple properties, the “Locations” feature can be a game-changer. It lets you separate data by building address or site, giving you a clear view of all your assets across your portfolio.
Step 3: Install Sensors in the Building
Placement Guidelines for Different Sensors
When installing temperature and humidity sensors, make sure they’re positioned away from heat sources, air vents, and drafts. These sensors play a crucial role in HVAC systems and cold-chain monitoring, so prioritize areas where climate control is most important.
For motion and door sensors, focus on entry points, hallways, and other critical areas where tracking movement or access is necessary. If you’re using motion sensors with 3-axis detection, they can be installed even in tight or unconventional spaces. On the other hand, air quality sensors – designed to measure CO2 or PM2.5 levels – should be placed in well-populated areas like conference rooms, lobbies, or open office spaces to ensure effective monitoring of indoor air quality.
Avoid placing sensors or antennas inside metal enclosures, as this can disrupt signal transmission. For outdoor setups, antennas should be elevated at least 13 feet (4 meters) above any obstacles to ensure clear communication. Once all sensors are in place, it’s time to test their connectivity.
Test Signal Strength
Before securing a sensor permanently, test its connectivity. Power on the sensor and use the manual trigger button to send a test uplink. Then, check the network server console to verify signal quality metrics like RSSI (Received Signal Strength Indicator) and SNR (Signal-to-Noise Ratio).
Using a temporary “sniffer” gateway can help you evaluate the link budget at various locations throughout the building. Look for heartbeat packets or join logs in the console to confirm that the sensor is communicating effectively. If the RSSI or SNR values fall outside acceptable ranges, try repositioning the sensor or consider adding another gateway to improve coverage. Once you’re satisfied with the connectivity, secure the sensor in place using adhesive backing or mounting screws.
sbb-itb-0e600ab
Step 4: Activate and Configure Sensors
Power On and Join the Network
Once you’ve confirmed the signal strength, it’s time to power on your CHOOVIO sensor. Most models activate either by inserting the battery or flipping a power switch. Make sure you’re using batteries with sufficient voltage to avoid connection issues. Additionally, ensure the sensor is registered with your LoRaWAN network server using the necessary credentials – DevEUI, JoinEUI, and AppKey for OTAA. When powered on, the sensor automatically sends a join-request to your LoRaWAN gateway, and the network server completes the handshake by responding with a join-accept. You can verify this process by checking the “Traffic” or “Joining” tabs in your network console. Many CHOOVIO sensors also feature LED indicators that give you instant visual confirmation of the connection status.
If your sensor includes a manual trigger option, press the test button immediately after powering it on. This will send a data packet, allowing you to check for stable RSSI and SNR values in the network console.
Once the sensor successfully joins the network, you can move on to configuring its settings to align with your building’s specific requirements.
Set Configuration Parameters
After the sensor is connected, adjust its settings to ensure they meet your building’s needs. One of the most critical settings is the reporting interval. For HVAC sensors, it’s recommended to set the interval between 5 and 10 minutes. For example, a sensor transmitting every 5 minutes (288 transmissions per day) typically consumes about 0.25 mAh daily. With a 2,600 mAh battery, this setup can last anywhere from 5 to 10 years.
For event-driven devices, such as the Dragino LDS02 door sensor (available for $22.00), configure it to send data only when specific events occur – like a door opening or a leak detection. Additionally, enabling Adaptive Data Rate (ADR) can help optimize communication speed and power consumption automatically based on signal quality. This feature is particularly useful in buildings with dense environments.
Lastly, keep an eye on the sensor’s battery status through your dashboard or LED indicators. This will help you identify potential issues, such as a lack of nearby gateways or invalid security keys, ensuring uninterrupted operation.
Step 5: Verify Data Transmission and Integration
Check Uplink Data in Network Console
Once your CHOOVIO sensors are connected to the network, the next step is to confirm they’re sending data correctly. Open your network server console, such as ChirpStack or Helium, and head over to the “LoRaWAN frames” tab. Here, you should observe raw radio traffic. For OTAA devices, look for a sequence that includes a JoinRequest followed by a JoinAccept. Additionally, keep an eye out for UnconfirmedDataUp or ConfirmedDataUp messages.
Make sure the data is being decrypted and decoded accurately. Switch to the “Live Data” or “Events” tab, where you should see a readable JSON structure, such as { "ambient_temperature": 72.5, "relative_humidity": 59 }, instead of an encrypted, unreadable blob. If your gateway logs show activity but the device logs don’t, this could point to a decryption issue – likely caused by incorrect entries for DevEUI, AppEUI, or AppKey.
Pay close attention to the signal metrics included in the uplink metadata. Check the RSSI (Received Signal Strength Indicator) and SNR (Signal-to-Noise Ratio) to confirm the connection is strong enough for reliable data transmission. If you encounter a “MIC error” in the console, double-check that your AppKey or session keys are entered correctly. For ABP devices that reset their frame counters after power cycles, enable the “Disable frame-counter check” option in your network server settings to prevent packet loss. These steps ensure your sensor authentication and data decryption are functioning as expected.
Integrate with Monitoring Dashboards
Once your uplink data is verified, you can move on to integrating it with a monitoring dashboard. Platforms like TagoIO offer pre-built Smart Building Monitoring Templates, complete with animated icons for features such as door status, motion detection, and leak alerts, as well as historical data tables. Use TagoIO’s “Live Inspector” tool (accessible via the green “Play” icon) to confirm that raw data is arriving as expected.
Ensure your network server settings are consistent with the sensor registration steps you completed earlier. Configure the server to route data based on labels or groups, allowing you to organize multiple sensors into a single dashboard flow. Also, double-check that the payload codec (JavaScript decoder) in your device profile is correctly set up to translate Base64 hex strings into human-readable data. If your widgets display “No Data”, verify that the variable names in your widget configuration exactly match the keys in the decoded payload (e.g., ensuring door_open_status matches precisely).
Finally, use MQTT or platform-specific integrations to forward data from your network server to your application server. Generate API tokens in your dashboard and input them into your network server’s integration settings. If you’re deploying a large number of sensors, streamline the process by importing a CSV file containing DevEUIs, AppKeys, and labels. This method simplifies onboarding and ensures a smooth integration process.
CHOOVIO Sensors Comparison Table
Picking the right sensor for your smart building depends on what you need to monitor and where the sensor will be installed. CHOOVIO offers a range of sensor models tailored to various applications. Below is a quick comparison of their key specifications to help you decide.
| Sensor Model | Key Metrics | Price | Battery Life | Range | Best Use Case |
|---|---|---|---|---|---|
| Dragino LDS02 | Door/Window Open/Close | $22.00 | Multi-year | Long-range LoRaWAN | Entry monitoring, security alerts |
| Dragino LHT52 | Temperature, Humidity | $39.00 | Multi-year | Long-range LoRaWAN | HVAC optimization, indoor comfort |
| Dragino LWL04 | Water leak detection, duration, leak count | $33.00 | 2–10 years (16,000–70,000 uplinks) | Long-range LoRaWAN | Kitchens, bathrooms, mechanical rooms (IP65 waterproof) |
| RA02A | Smoke, fire signs | $69.00 | Wireless LoRaWAN | Long-range LoRaWAN | Fire safety, early warning systems |
| X1 Sensing Camera | Movement, visual data | $84.00–$140.00 | Low power | Long-range LoRaWAN | Asset protection, visual security verification |
| AM103 | CO2, Temperature, Humidity | $190.00 | Multi-year | Long-range LoRaWAN | Air quality monitoring, smart offices |
| VS121 | Occupancy, movement (AI-powered) | $336.00–$360.00 | Multi-year | Long-range LoRaWAN | Space utilization, workplace analytics |
For basic monitoring needs, the LDS02 and LHT52 are reliable options for tracking entry points and maintaining climate control. In areas prone to water damage, the LWL04 excels with its waterproof design and long battery life. If air quality is a concern, the AM103 offers CO₂ monitoring alongside temperature and humidity tracking. For advanced workspace management, the VS121 uses AI to provide detailed occupancy insights.
For enhanced security, the X1 Sensing Camera combines movement detection with visual data, making it a strong choice for asset protection and security verification. Every CHOOVIO sensor supports US915, ensuring compatibility with North American deployments.
Conclusion
Deploying LoRaWAN sensors offers an effective and scalable way to monitor smart buildings. The setup process is straightforward: survey the site, install and register the gateway, add sensors, and confirm data transmission. With CHOOVIO’s pre-programmed sensors, which come with pre-loaded keys (DevEUI, AppEUI, and AppKey), your system can be up and running in just a few hours.
A single gateway can cover up to 6,560 feet in urban areas and handle hundreds of sensors simultaneously. You can start small – perhaps with temperature and humidity monitors – and gradually expand to include water leak detection, occupancy sensors, and air quality monitoring, all without needing to overhaul your existing infrastructure.
CHOOVIO offers a wide range of sensor options, with over 200 types in its catalog. Whether you need a basic door sensor for around $22.00 or an advanced occupancy sensor, there’s a solution for every monitoring requirement. With batteries lasting between 5 and 10 years, even large-scale deployments require minimal maintenance. Plus, the unified cloud dashboard simplifies management by consolidating all data – whether it’s HVAC performance, water leaks, or CO₂ levels – into a single platform. The Gold Plan subscription, priced at $9.99 per device per month, provides unlimited alerts and 12 months of data retention, helping you identify patterns and optimize operations with ease.
This combination of long-range connectivity, low maintenance, and centralized management makes it easy to expand your monitoring system room by room or floor by floor. Building managers can enhance efficiency, ensure safety, and improve occupant comfort while reducing energy and maintenance costs – a practical solution for modern building management.
FAQs
What’s the best way to place LoRaWAN sensors in a smart building for optimal performance?
To get the most out of your LoRaWAN sensors in a smart building, start by examining the building’s layout. Look for anything that might block signals, like walls, large pieces of furniture, or metal structures. Place the sensors in the areas where they’ll be used, particularly near the building’s edges or in spots farthest from the gateway, to check how well the signal reaches those locations.
During setup, take time to measure signal strength and any RF path losses. This step is crucial for ensuring solid communication between your sensors and the gateway. If you’re not experienced with RF technology, don’t worry – there are tools and software available that make this process much easier. By taking the time to plan sensor placement and verify signal reliability, you can set up a LoRaWAN network that runs smoothly throughout your smart building.
What are the ongoing costs of maintaining a LoRaWAN sensor network?
Maintaining a LoRaWAN sensor network involves a few recurring costs, such as device maintenance, network management, and possible subscription fees for data services or cloud platforms. That said, the low-power design of LoRaWAN helps keep energy consumption and operational costs relatively low over time.
Additional expenses might include replacing sensor batteries, updating firmware, or expanding the network with more devices. These costs usually depend on the scale and complexity of your setup but are typically straightforward to manage.
How can I fix connectivity issues with LoRaWAN sensors in smart buildings?
To address connectivity problems with LoRaWAN sensors, start by checking the basics. Ensure the gateway is online and actively transmitting data updates – ideally within the last few minutes. Then, confirm the sensor is sending data and is positioned within the gateway’s effective range.
If these steps don’t resolve the issue, take a closer look at the gateway setup. Double-check that all antennas and cables are securely connected, and make sure there are no physical barriers interfering with the signal. Also, verify that both the sensor and gateway are optimally placed to support strong signal transmission.
If the problem persists, refer to the troubleshooting guide specific to your device or reach out to technical support for expert help. For a more reliable IoT network experience, consider solutions tailored for LoRaWAN systems, like those developed by CHOOVIO.

